

 Modern Warfare 4
The main Frequency callouts in BO7 Ranked are Circle, Mid, Cut, Window, Server, Plat, Alley, Square, Pipes and Rails. The map is mirrored, so most callouts come in pairs: blue on the west half and orange on the east. Hardpoint has four hills in a fixed order. P1 is Circle in the south. P2 is Orange, the main room on the east side. P3 is the hallway by blue Hall on the west side. P4 is Rails in the north. After P4 it goes back to P1. In Search and Destroy (SnD), both sites are on the blue half. A is in the south-west by the Catwalk, and B is in the north next to Rails.
Frequency callout map
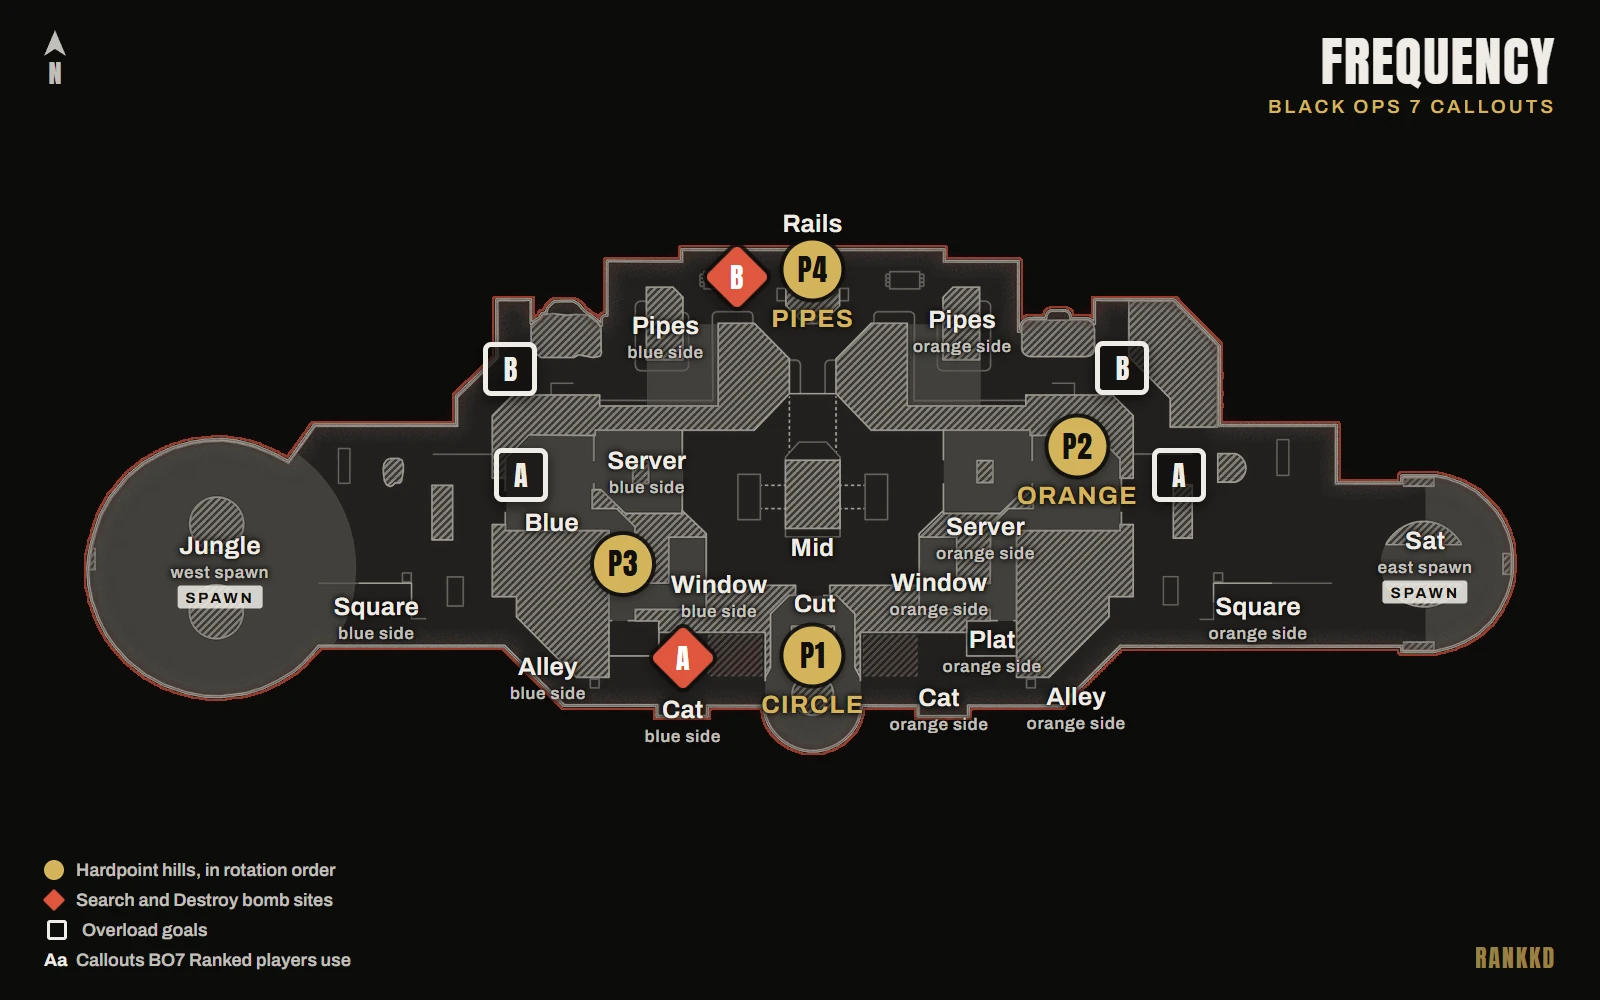
North is the Pipes side. Think of the map in bands:
- North: Pipes, with P4 in the middle, the Rails behind it and B at its blue end.
- Center: Mid, an open top level over Bottom Mid. Two yellow ladders link them.
- South: Circle (P1), with Cut up to mid and the Catwalk on either side. A is on the blue half of the Catwalk.
- West: the blue side, officially Cliffside. It has the Jungle spawn, the Blue room and P3 by blue Hall.
- East: the orange side, officially Satellite. It has the Sat spawn and the Orange room, which is P2.
Frequency callouts list
Say the side with the call: blue Window, orange Plat.
| Callout | Where it is |
|---|---|
| Jungle | West spawn. Defenders start here in SnD |
| Sat / Sat Spawn | East spawn, under the satellite. Attackers start here in SnD |
| Mid / Top Mid | Open top level in the middle, officially Engine |
| Bottom Mid / Bottom Ladders | Lower level under mid, officially Maintenance |
| Top Ladder (blue / orange) | Head glitch at the top of each mid ladder |
| Balc / Balcony | Balcony over mid, on the north side |
| Tunnel | Passage under Balc, toward P4 |
| Rails | Railings along the north edge, behind P4 |
| Cut / Mid Cut | Cut between mid and Circle |
| Circle / Elevator | Round platform at the south end. P1. Players split it into outer and inner |
| Blue, Orange | The main room on each side: Blue in the west, Orange in the east (P2) |
| Server (blue / orange) | Room on each side between Blue or Orange and mid, north of Window |
| Window (blue / orange) / Top Window | Window room on each side that looks into mid |
| Hall (blue / orange) | Hallway on each side. P3 is the hallway by blue Hall |
| Plat (blue / orange) | Platform on each side over the Catwalk |
| Alley (blue / orange) | Back alley on each side, along the south edge |
| Cat (blue / orange) | Each half of the Catwalk, next to Circle |
| Square (blue / orange) | Square head glitch in each spawn-side lane |
| Pillar (blue / orange) | Pillar cover in each spawn-side lane |
| Ammo | Head glitch at the ammo box west of Blue |
| Barrels | Barrels at the back of the west lane |
| Close Tree, Far Tree | Trees in the east lane, one nearer mid and one near the spawn |
| Pipes (blue / orange) | Each side's half of the north area |
| Inner Pipes (blue / orange) | Inner part of each Pipes area |
| Outer Pipes (blue / orange) | Outer edge of each Pipes area |
| Steps (blue / orange) | Steps up from Pipes toward Cliff |
| Cliff (blue / orange) | Cliff corner at each end of the north edge |
What is Frequency in Black Ops 7?
Frequency is a remake of the 2018 Black Ops 4 map. It came to Black Ops 7 with Season 05 on July 23, 2026. Most callouts are the old Black Ops 4 league calls.
Is Frequency in BO7 Ranked Play?
Yes. Frequency joined Ranked Play in Season 05 in all three modes: Hardpoint with four hills, SnD and Overload. BO7 Ranked Play has ended. Season 06 was the last season.
Frequency at the Esports World Cup
Its only competitive use in BO7 was Hardpoint at the Esports World Cup 2026 (EWC), August 5 to 9.
Frequency Hardpoint hills and rotation
Hill order
| Hill | Name | Where |
|---|---|---|
| P1 | Circle | Round platform on the south edge |
| P2 | Orange | Main room on the east side |
| P3 | Blue hallway | The hallway from blue Hall down to blue Plat, facing mid. Players just call it P3 |
| P4 | Pipes | North center, in the middle of Pipes, above the Tunnel into mid, with the Rails behind it |
After P4 it goes back to P1.
When to rotate on Frequency
On P1, both teams arrive at the same time, so get there fast. With 15 to 20 seconds left on P2, push out through mid to flip the spawns so your team spawns near P3. To read spawns, keep one player a little back or in mid. If a teammate sits on one side of the hill, the enemy spawns on the other. For more, see Hardpoint rotations.
P1: flood it, or break it with an AR
- Flood it. Send two or three through Alley or Window, and one through mid to watch the door. Put three on the hill, and the last player picks up mid.
- Pre-nade and pre-fire. Throw a nade off the wall on the way in, and pre-fire every corner. The hill is tight.
- Break it with an AR. Put someone with an AR on one of the boxes to kill anyone who challenges the outside. Don't just run the front with SMGs.
P2: trap them in the back spawn
- The back spawn is sticky. Once the enemy spawns behind P2, they keep spawning there as long as nobody on your team pushes out the back. Keep getting kills from the hill and they stay trapped.
- Roles. One player in orange Server forces their spawns deeper. One in Window holds mid, one or two play time and one floats for flanks.
- Breaking it. Don't run the front alone. Take Pipes or P1 to hit the back while your team pushes the front.
P3: hold the P1 lane from height
- Hold. Put an AR on the box or up on Plat watching the P1 lane, one player up in blue Server watching mid and one in Window.
- Break. Flood through P1 along the Catwalk, through mid into Window, or through Server. Push whichever side gets the first kill.
P4: win it with information
- Both teams spawn far away. Hold time with an AR in your Outer Pipes, down the long line to the hill. Most players run SMGs there.
- Break it from the front or through mid, top or bottom. The sides take too long.
- Use a streak as it goes live. It shows you where they are. Then stun before each fight.
Frequency Search sites
Where A and B are
Both sites are on the blue (west) half. A is in the south-west, below blue Plat at the end of the Catwalk. B is in the north, between blue Pipes and Rails. Attackers start at Sat in the east, and defenders start at Jungle in the west. Both teams spawn the same distance from mid, so you meet at the middle line.
For bomb timers, defuse math and opening duels, see SnD tips.
Defense: three players cover the map
One player sits by B and looks across Rails, so nobody reaches B unseen. One plays mid, which sees Balc, both mid entrances and the flank through mid. One sits on top of blue Plat, over A. The fourth plays off their info. Don't stack a lane or leave one player alone in Bottom Mid. That opens the map for a pinch or a free plant.
Offense: start like a defense
Spread out early and let them show their habits. Then attack the pattern. You have 1:30 to plant, so there's time to draw them in.
Plant for the spot you'll check from
On A, you can't see the bomb from Alley, and from Plat only by looking over the building. Plant for the Circle side. Then check it from Outer or Inner Circle, as far back as you can.
Frequency Overload
Each half has two goals, A and B, lettered in game, and you score in the two on the enemy's half. The goals moved with Season 06. A now sits by that side's main building, Blue in the west and Orange in the east. B sits on the north edge by Steps. Before Season 06, A was out in the spawn-side lane and B was up in that side's Pipes, closer to mid.
- Own mid first. The device spawns in mid every time. Rotate to it like a hill.
For more, see the Overload guide.
How RankKD maps your deaths on Frequency
Frequency punishes the same few mistakes again and again. RankKD shows you which ones you're making.
RankKD records every match on its own, so there's nothing to press. After the match, it reviews the footage and puts every kill and death on the timeline. On Frequency, that gives you:
- A death heatmap by callout. Your deaths grouped into named areas of the map, so "I keep dying on P2" becomes a specific spot you can fix.
- Spawn-flip deaths in Hardpoint. The deaths that came right after a spawn flip, hill by hill.
- Rotation timing. Whether you left for the next hill too early or too late.
- Early deaths in SnD. First deaths of a round, and deaths early in a round, called out round by round.
- Death discipline. Deaths while sprinting, reloading or re-peeking without info, fights you took while already hurt, and deaths right after your own kill.
- Receipts. After each match, RankKD writes a coach's note. Every mistake in it links to the exact moment in the video, with your mouse, keyboard or controller inputs on screen.
- Map stats. How you do on each map and mode, and your worst map and why, compared with your rank and the rank above.
Example (illustrative, not real data): say your heatmap flags the front of P2 as a top death spot. That's running the hill head-on instead of hitting the back through Pipes or P1. Each of those deaths links to its clip.
RankKD analyzes your match after it ends, never while you play. No overlays, no assists, no live info, no mods and no in-game presence (read the full disclosure). RankKD supports Black Ops 7 and Modern Warfare 4 when it launches, including MW4 Ranked Play from the day it goes live. More on RankKD: how it works, VOD review, Call of Duty coaching and how to VOD review CoD.
RankKD runs on Windows PC. Download RankKD.
Frequency FAQ
What are the main callouts on Frequency?
Circle, Mid, Cut, Window, Server, Plat, Alley, Square, Pipes and Rails, with blue or orange for the side.
What are the Hardpoint hills on Frequency?
Four: P1 Circle, P2 Orange, P3 in the blue hallway by Hall and P4 Pipes.
What is the Frequency Hardpoint rotation?
P1, P2, P3, P4, then back to P1. There's no P5.
Where are the bomb sites on Frequency?
Both are on the blue half. A is in the south-west by the Catwalk, and B is in the north next to Rails.
What do blue and orange mean on Frequency?
They're the two halves of the map. Blue is the west half, with the Jungle spawn. Orange is the east half, with the Sat spawn.