
 Modern Warfare 4
The main Gridlock callouts in BO7 are Mid, the 18, Shop (also called Boxes), Caution, the Street, Window, Van, Broken, Ice Cream, Dojo and Showers. Gridlock Hardpoint has four hills in a fixed order. P1 is Mid, on the wrecked vehicles in the middle of the map. P2 is by the 18, at the north end of the Street. P3 is the open-roof room inside the bathhouse on the east side. P4 is the restaurant at the south end of the Street. After P4 it goes back to P1. In Search and Destroy (SnD), A is in the P3 room. B is on the west side, by the Van outside the P4 restaurant. In Overload, the device spawns in mid.
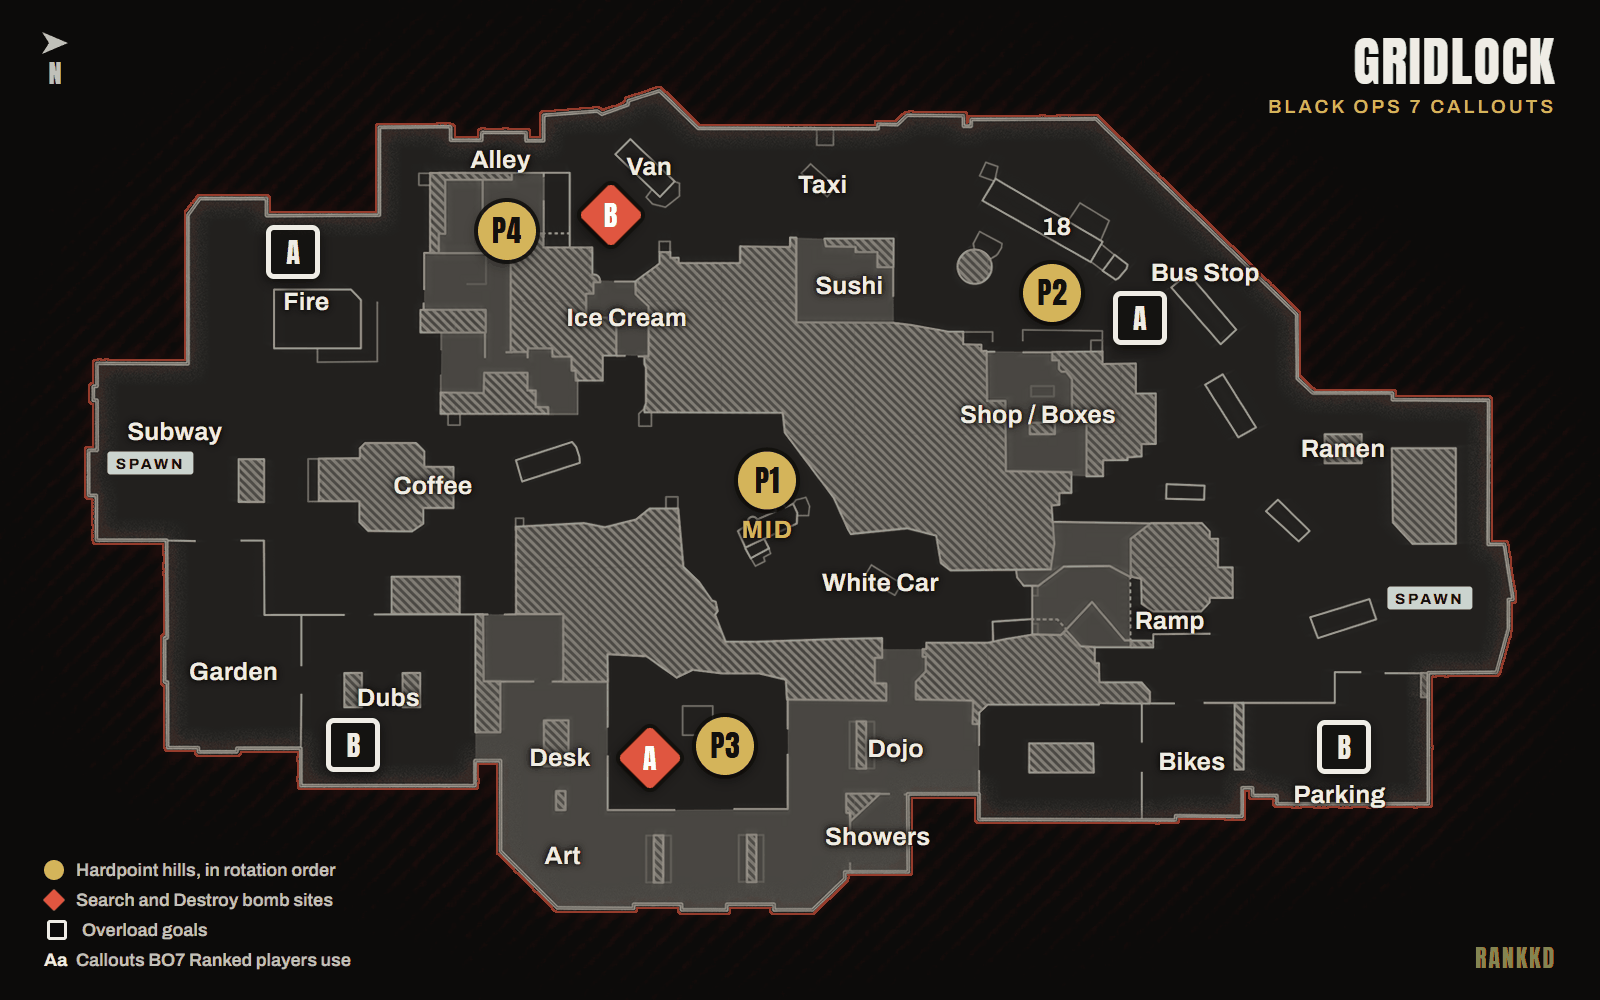
Gridlock callout map
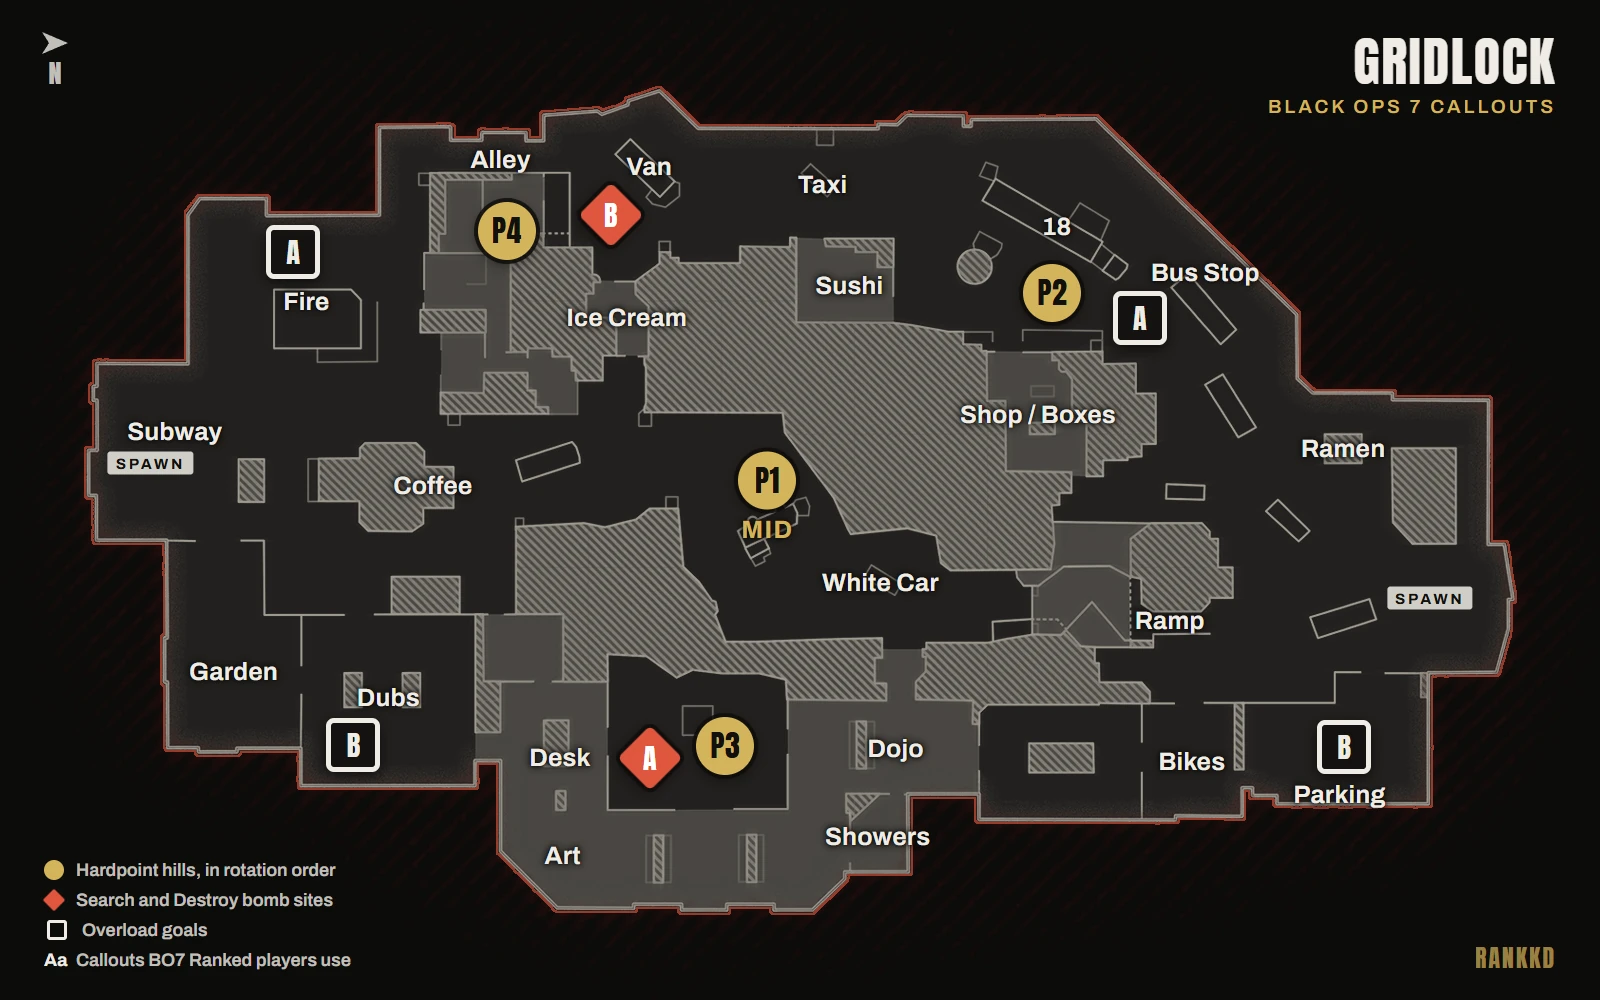
North is the Back Street spawn. Think of the map in bands:
- North: Back Street, the spawn road along the top. The Bus Stop, the fire trucks, the ambulances, Ramen, L and Parking are here, and the Ramp climbs toward mid.
- West: the Street. It runs from P2 at the 18, past Taxi and the Van, down to the P4 restaurant.
- Center: Mid (the Expressway on the official map). P1 is on the wrecked vehicles. Shop and Caution sit between mid and Back Street. Broken and Ice Cream lead to P4.
- East: the bathhouse (the Onsen on the official map). P3 and SnD A are in its open-roof room, with Dojo, Showers, Desk and Lockers around it. Slate and Bikes run north to Parking.
- South: the spawn by Subway (the Promenade on the official map). Coffee faces mid, Fire is behind P4, and Dubs and Garden are in the south-east.
Gridlock callouts list
These are the callouts Ranked players and pros use on Gridlock. A few spots have two names, like Shop and Boxes.
| Callout | Where it is |
|---|---|
| Mid | The middle of the map, with the wrecked vehicles. P1 is here |
| White Car | A white car in mid, by Short |
| Yellow Car / Yellow | A yellow car between P1 and P3. A head glitch on P1 |
| Blue | A blue vehicle between mid and Broken |
| Broken / Top Broken | The broken corner between mid and P4 |
| Ice Cream / Vending | The room between P4 and mid, with ice cream freezers and vending machines. It zig-zags from the Van side into mid, so some call it Zigs |
| Ladder / Top Ladder | The ladder up into P4 from the Broken side |
| Shop / Boxes | The shop between P2 and Caution. Also called Mail |
| Caution / Rubble (top / bottom) | The rubble pile with caution blocks on top, between mid and Back Street. Top Caution is also called Overpass and bottom Caution the Underpass. Pros also call it the Bridge: top Bridge, or under the Bridge |
| Short / Hole | The gap from mid into Dojo |
| Street / B Street | The west lane, from P2 past Taxi and the Van to P4. B Street is the end by the B site |
| 18 / 18-wheeler | The jack-knifed semi truck at P2 |
| Cop / Cop car, Pillar | The police car at P2. A head glitch |
| Sushi / Tickets | The room on the east side of the Street, between Taxi and P2 |
| Taxi | The taxi on the Street. A head glitch |
| Van | The truck outside P4. SnD B is here |
| Window / Top P4 | The restaurant's upper window, over the Street and mid |
| Alley / Back Alley | The narrow lane behind P4, on the west edge |
| Fire / Back Fire, Tree | The burning car behind P4, near the south spawn. Pros call it Tree, for the tree next to it |
| Back Street | The north spawn and the long road through it, at the bottom of the Ramp |
| Bus Stop (top / bottom) | The bus shelter on Back Street, north of P2 |
| F1 / Fire truck 1 | The first fire truck on Back Street |
| F2 / Fire truck 2 | The second fire truck, by the north spawn |
| A1 / Amby | The first ambulance on Back Street |
| A2 | The second ambulance, nearer the north spawn |
| Ramp | Fallen freeway signs that ramp up from Back Street and look over mid |
| Vent / Vents | Vents off Back Street, toward Bikes and Slate |
| Ramen / Noodles | The ramen stand by the north spawn |
| L / Back L | The L-shaped corner at the north spawn |
| Parking | The parking corner in the north-east |
| Bikes / Bike cut | The bike rack room between Parking and Slate |
| Slate / Rock | The room with the slate island, between Bikes and Dojo |
| Dojo / Dojo cut | The room on the north side of P3 |
| Showers | The shower room east of Dojo |
| Glass / Outer Showers | The glass-roofed walkway on the east side of P3 |
| Desk / Reception | The bathhouse's reception desk, a doorway into P3 |
| Art | The bathhouse corner east of Desk |
| Lockers / Closet | The locker room, a way into the bathhouse from Dubs. Also called Lockers cut |
| Subway | The subway entrance at the south spawn |
| Shack | The small kiosk next to Subway |
| Coffee | The cross-shaped coffee shop between Subway and mid |
| Dubs / Dub cut, Courtyard | The room with two matching blocks, between Garden and Lockers. Pros call the yard outside it the Courtyard |
| Garden | The garden next to Dubs, on the south edge |
What is Gridlock in Black Ops 7?
Gridlock is a mid-size map on a Japanese freeway that has collapsed into the city below. It mixes long fights down the Street and Back Street with tight fights in the bathhouse and the restaurant. It first shipped in Black Ops 4 in 2018 and came to Black Ops 7 in Season 03. In BO7 the freeway is down at street level, which adds the rubble, the Caution blocks and the Ramp. The spawns changed too, so don't play off BO4 spawn habits.
Is Gridlock in BO7 Ranked Play?
Yes. Gridlock was in the Ranked Hardpoint, SnD and Overload pools. Hardpoint and Overload added it in the Season 03 map evaluation, and all three modes had it in the Season 05 pool. BO7 Ranked Play has ended. Season 06 was the last season.
Gridlock in the CDL
Gridlock joined the CDL 2026 map pool at Stage III in April 2026, as a Hardpoint and SnD map. Overload followed at Stage IV in May 2026, with a single ball spawn. Gridlock Hardpoint was also played at the Esports World Cup 2026.
Gridlock Hardpoint hills and rotation
Hill order
| Hill | Name | Where |
|---|---|---|
| P1 | Mid | The wrecked vehicles in mid, between White Car, Yellow Car and Blue |
| P2 | By the 18 | The north end of the Street, by the 18 and the Cop car. Players just say P2 |
| P3 | Bathhouse room | The open-roof room inside the bathhouse, between Dojo and Desk. Players just say P3 |
| P4 | Brown | The restaurant's ground floor, at the south end of the Street. Window is the floor above. Players just say P4, and pros call the whole building Brown |
After P4 it goes back to P1.
When to rotate on Gridlock
Rotate early. From the wrong side, the spawns are far and the way in is a funnel. Play for the next hill, not the old one. If P2 isn't breaking, leave for P3 with about 20 seconds left. More in Hardpoint rotations.
In one coach's BO7 spawn maps, each hill has two main spawns with backups behind them. Cross the halfway line and the game blocks the enemy's main spawn on that side. They spawn at the backup furthest from your team, which can be behind you. BO7 spawns ignore blocks more often than BO4's did, so treat the reads below as a guide, not a guarantee.
P1: end it with their spawns at Dubs
- Hold the head glitch that sees top Broken, Ice Cream and the front. Keep one player on top of or under the Bridge to watch the flank and block for P2.
- Set up P2 late. Take Caution and the 18 side near the end of P1. The enemy then spawns at Dubs, the furthest spawn from P2.
- Blow up the car. From the P4 side, run mid and land a grenade on bottom Caution. The vehicle there explodes, often for a free first kill.
P2: play it from the Bus Stop side
Both sides of P2 can spawn far out. The Bus Stop and F1 side is easier to hold, so try to have it when P2 pops.
- One player blocks from top Caution, watching mid and the flank.
- The rest play the 18. Catch players coming out of P4 or through Ice Cream. Once you're set, stack time.
- Watch the Street. P2 spawns can drop enemies on the Street right in front of the hill.
P3: set up early and block Subway
Only four small doorways lead in. Set up early and it's hard to break.
- Spawn them at P2. Keep one player around Subway to block it, and push one through to Slate. The other two play time and fill the gaps.
- Breaking it? Holders like to sit behind the tree, and the room is open to the sky. Grenade the tree first.
- Odd spawns happen. After a strange emergency spawn, play as if the enemy has the map control that would cause it.
P4: block the back spawns
Activision's BO7 map guide calls the restaurant one of the strongest spots on the map, with views over the Street, mid and back toward the south spawn.
- Aim for the Fire side. P4's two main spawns are the 18 and Fire. Fire is better, though it can drop you in awkward spots.
- Block the back. Block the three back spawns: Fire, Garden and Dubs. Keep one player on time and one cutting off the front.
- Don't push past the Van. That blocks the 18 spawn, and they spawn at Dubs, behind you.
- Hold it three ways: one in Window on the front, one in Broken on the mid push, one floating in Alley. Breaking it takes the whole team pushing up the Street together.
How RankKD helps: RankKD breaks down your Gridlock Hardpoint hill by hill, with your rotation timing and your deaths to spawn flips.
Gridlock Search sites
Where A and B are
A is in the P3 room in the bathhouse, on the east side. B is on the west side, by the Van outside the P4 restaurant. Both sites sit in the south half of the map. Expect to defend from the south end, near Subway, and attack from the north end.
For bomb timers, defuse math and opening duels, see SnD tips.
Gridlock Search tips
- The opening grenade. On defense, run mid and throw a grenade onto bottom Caution. The vehicle there blows up. You get a first blood, or they stop running that lane.
- Hitting A. Defenders like to hold behind the tree. The P3 room is open to the sky, so throw a grenade over before you swing.
- Sniping. Top of the 18 is a good sniper spot. From up there you can hold off pushes up the Street and through Sushi.
- Clearing P4. Players like to hold a corner inside P4. You can shoot it through the brick wall from Alley.
How RankKD helps: RankKD shows where you died first in each Gridlock SnD round, on a death heatmap grouped by callout.
Gridlock Overload
Where the device and goals are
The device has one spawn, in mid by the P1 vehicles. You score by carrying it into one of the two goals at the enemy's end, lettered A and B in game. Each team's goals sit deep, near its own spawn. At the south end, A is around Fire on the west side and B is in the Dubs pocket on the east side. At the north end, A is at the bend between the 18 and the Bus Stop, and B is at Parking.
- Every reset is a mid fight. The device only spawns in mid, so win mid before it drops.
- Escort the carry. The goals are deep, so the carry is long. Push out ahead of your carrier so they have blockers in front, instead of letting them run it alone.
- Pick the open goal. One of the enemy's two goals is often much harder to reach. Commit to the one you can get to.
For the rules, roles and device timers, see the Overload guide.
How RankKD maps your deaths on Gridlock
Every hill above has a mistake Gridlock punishes. RankKD shows you which ones you're making.
RankKD records every match on its own, so there's nothing to press. After the match, it reviews the footage and puts every kill and death on the timeline. On Gridlock, that gives you:
- A death heatmap by callout. Your deaths grouped into named areas of the map, so "I keep dying on P1" becomes a specific spot you can fix.
- Spawn-flip deaths in Hardpoint. The deaths that came right after a spawn flip, hill by hill.
- Rotation timing. Whether you left for the next hill too early or too late.
- Early deaths in SnD. First deaths of a round, and deaths early in a round, called out round by round.
- Death discipline. Deaths while sprinting, reloading or re-peeking without info, fights you took while already hurt, and deaths right after your own kill.
- Receipts. After each match, RankKD writes a coach's note. Every mistake in it links to the exact moment in the video, with your mouse, keyboard or controller inputs on screen.
- Map stats. How you do on each map and mode, and your worst map and why, compared with your rank and the rank above.
Example (illustrative, not real data): say your heatmap flags the Street past the Van as a top death spot on P4. That's the classic P4 mistake. The push past the Van blocks the 18 spawn, so the enemy spawns at Dubs, behind you. Each of those deaths links to its clip.
RankKD analyzes your match after it ends, never while you play. No overlays, no assists, no live info, no mods and no in-game presence (read the full disclosure). RankKD supports Black Ops 7 and Modern Warfare 4 when it launches, including MW4 Ranked Play from the day it goes live. More on RankKD: how it works, VOD review, Call of Duty coaching and how to VOD review CoD.
RankKD runs on Windows PC. It shows you where and why you die on Gridlock. Download RankKD.
Gridlock FAQ
What are the main callouts on Gridlock?
Mid, the 18, Shop (or Boxes), Caution, the Street, Window, Van, Broken, Ice Cream, Dojo and Showers. The 18 is the jack-knifed semi truck at P2.
What are the Hardpoint hills on Gridlock?
There are four: P1 Mid, P2 by the 18, P3 in the open-roof room of the bathhouse and P4 in the restaurant.
What is the Gridlock Hardpoint rotation?
P1, P2, P3, P4, then back to P1. There's no P5. Rotate early. If P2 isn't breaking, leave for P3 with about 20 seconds left.
Where are the bomb sites on Gridlock?
A is in the P3 room in the bathhouse, on the east side. B is on the west side, by the Van outside the P4 restaurant.
Is BO7 Gridlock the same as BO4 Gridlock?
Not quite. The freeway is now at street level, which adds the rubble, the Caution blocks and the Ramp. The spawns changed, and blocks hold less often than in BO4. The hill order is the same as BO4's CWL rotation.