

 Modern Warfare 4
The main Scar callouts are Blue, Green, Top Blue, Top Green, Shop, Mid Cut, Plane, Tank, White Wall, 18, Gens, Sat, Shack, Yard and Ammo. Scar Hardpoint has five hills in a fixed order. P1 is in the middle of the map, on the street below the Plane. P2 is Red, the motel on the south side. P3 is under the crashed Plane on the north edge. P4 is inside Blue, the blue building on the east side. P5 is beside Green, the green building in the north-west. After P5 it goes back to P1. In Search and Destroy (SnD), both sites are on the west half. A is at the west end of Red. B is by Green and Back Alley, at P5. Overload has two goals at each end.
Scar callout map
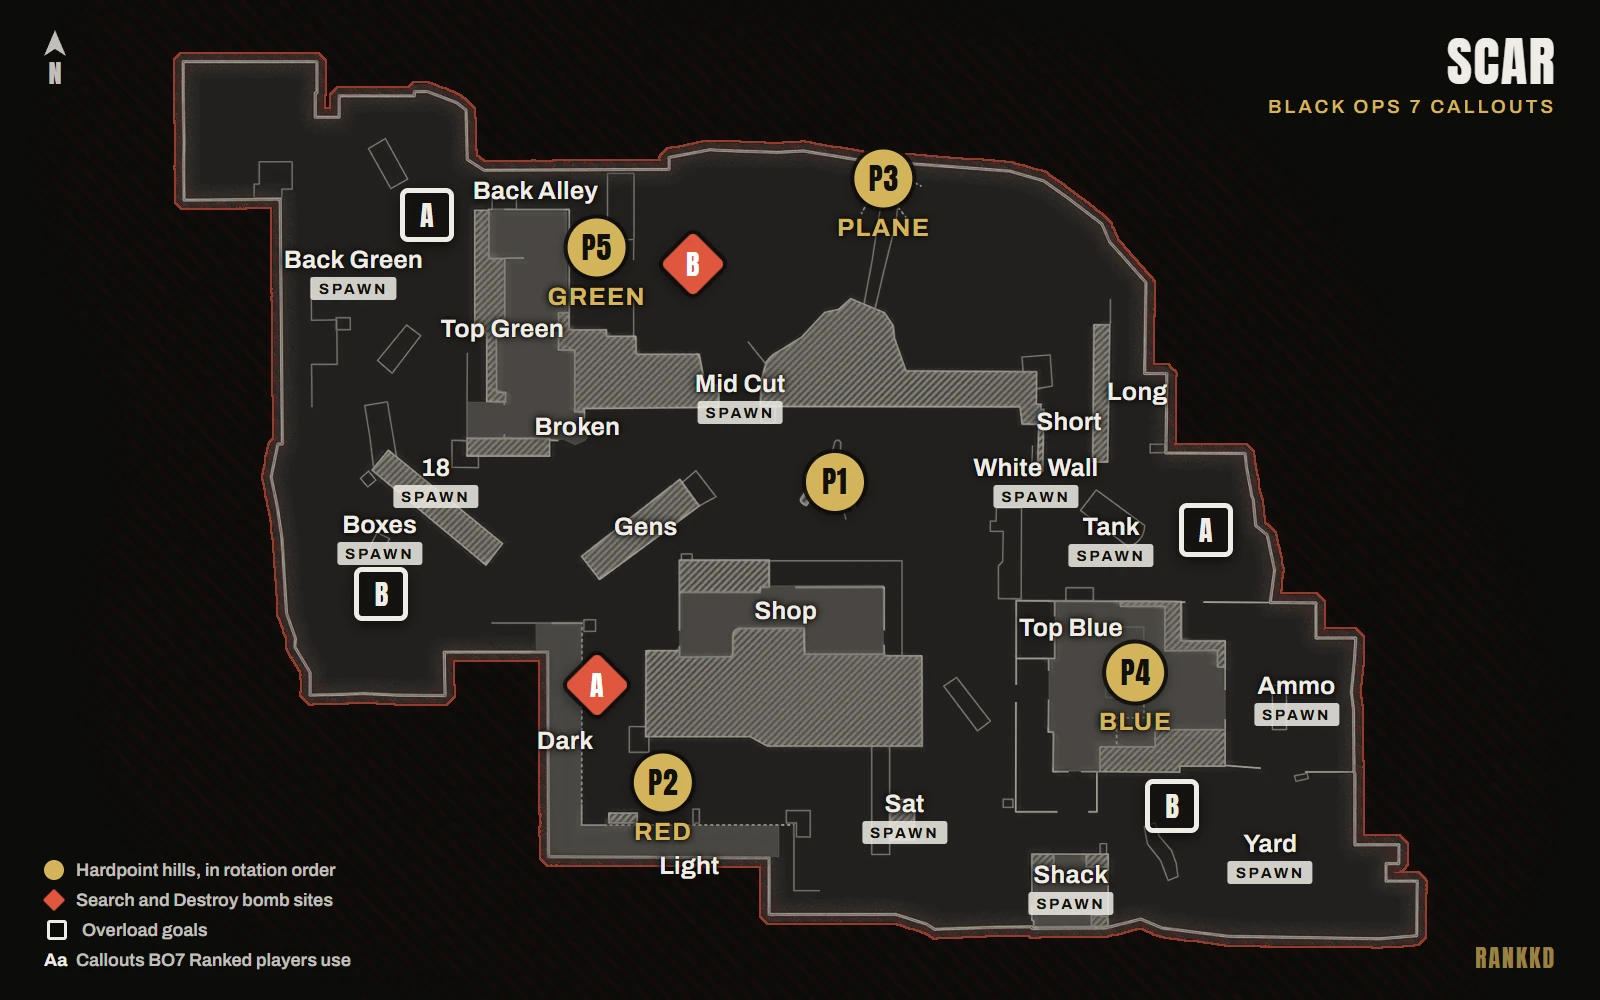
West is the green side, named for Green. East is the blue side, named for Blue. Think of the map in bands:
- West: the Back Green spawn, with Bridge and Useless behind it. Green (P5) and Back Alley are at its north end, and 18 and Boxes are to the south.
- North: the crashed Plane (P3), with Dirt and Grass on either side of it.
- Center: mid (P1). Mid Cut leads in from the green side, and Shop sits to the south.
- South: Red (P2), the motel, split into Dark on the west and Light on the east, with Sat beside it.
- East: Blue (P4), with Tank and White Wall between it and P1. Long and Short run down from the Plane. The Yard spawn and Ammo are behind Blue.
Scar callouts list
Most of these names come from pro and Challengers scrim comms, collected on one Ranked coach's Scar callout map. Blue and Green are the blue and green buildings on the east and west sides. The official map labels them Post Office and Wood Shop.
| Callout | Where it is |
|---|---|
| Back Green | The west main spawn, behind Green |
| Useless / Back Useless | The far north-west corner behind the spawn. With Bridge, the main P5 spawn |
| Bridge | The truck and bridge at the back of the Back Green spawn |
| Porch | A headglitch on the west edge, by the west Overload goals |
| Truck / Blue Truck | Two trucks: one by Green Stairs on the west side, and a white pickup west of Blue, the Blue Truck |
| Green Stairs | The outside stairs up Green |
| Green / Top Green / B Window | The green building and its top windows, at P5 |
| Back Alley / Alley | North of Green, by B and P5 |
| Broken / Top Broken / Church | The broken wall at Green's south end |
| 18 / 18-wheeler / Trailer | The trailer south-west of mid. The main P1 spawn on the green side |
| Boxes | By the west Overload goal. A main P2 spawn |
| Mid | The middle of the map, around P1 |
| Mid Cut / Midcut / B Cut | The cut between the green side and P1. A P4 spawn. In Search it's B Cut |
| Gens / Gen / Generator | The generator cover between mid and Shop |
| Shop / Market / Store / Yellow | The big shop south of P1 |
| Food | The west corner of Shop |
| ATM | The east corner of Shop |
| Deck | The north deck of Shop, facing P1 |
| Dirt | The dirt path from mid up toward the Plane |
| Plane | The crashed plane at P3 and its headglitch |
| Grass | North-east of the Plane |
| Red / Motel / P2 | The motel at P2. Its top floor is Top Red or Top Motel |
| Dark / Top Dark / Bottom Dark | The west (shaded) half of Red |
| Wood Stairs / Dark Stairs / Light Steps | Two sets of wood steps up to Red: one on the Dark side by A, one on the Light side |
| Light / Top Light / Bottom Light | The east (sunlit) half of Red |
| Caution | Caution-taped cover on P2 |
| Tarp | Two tarp headglitches: one on P2, one at the top of Long |
| Fire | Two burning corners: one by P2, one by Sat |
| Phone / Telephone | The phone corner on the P2 deck |
| Sat / Satellite | The dish south-east of Shop. A P2 spawn |
| White Wall / Wall / Sandbags | East of P1. Back White Wall is a common spawn |
| Tank | The tank east of P1. The main P1 spawn on the blue side |
| Short | The short lane from the Plane down to Tank |
| Long / Boat | The east lane from the Plane down to Fish |
| Fish / Back Boat | The off angle by the east Overload goal, at the back of Long |
| Blue / Top Blue | The blue building and its top floor, with windows over P1 |
| Server / Servers | The server half of Blue's top floor |
| Office | The office half of Blue's top floor |
| Blue Roof | The roof west of Blue |
| L | The L-shaped wall by Blue. A spawn |
| Shack / Shed / Hut | The shed south of Blue. A main P2 spawn |
| Yard | The east main spawn |
| Ammo | Behind Blue. The main P4 spawn |
What is Scar in Black Ops 7?
Scar is a new map that launched with Black Ops 7 on November 14, 2025, so there are no older callouts to unlearn. JSOC fights Cordis Die insurgents in a frozen Alaskan village. The power positions are Top Green, Top Blue and Top Red. Hold them and you control the map.
Is Scar in BO7 Ranked Play?
Yes. Scar was in the Ranked Hardpoint and Overload pools, and it joined Ranked SnD in Season 05. BO7 Ranked Play has ended. Season 06 was the last season.
Scar in the CDL
Scar was in all three CDL modes in the opening map set on November 25, 2025. It left the SnD pool at Stage IV on May 26, 2026, replaced by Sake and Hacienda. The CDL's latest competitive settings still list it for Hardpoint and Overload.
Scar Hardpoint hills and rotation
Hill order
| Hill | Name | Where |
|---|---|---|
| P1 | Middle of the map | The street below the Plane, between Mid Cut and Tank, with Shop to the south |
| P2 | Red | The deck in front of the motel on the south side, under its balcony |
| P3 | Plane | Under the crashed Plane on the north edge |
| P4 | Blue | Inside the blue building on the east side, by the Yard spawn |
| P5 | Green | Beside the green building in the north-west, by Back Alley and B |
Scar has five hills, not four. After P5 it goes back to P1.
When to rotate on Scar
Scar spawns are linear. If your team holds one side, the enemy spawns on the other. Once someone crosses the halfway line, they flip. Start blocking for the next hill's spawn with 20 to 30 seconds left on the current one. Hard block it: stand on one spawn point to force the enemy onto the other, so you know where they're coming from. Under the CDL rules, the next hill only shows 10 seconds before it goes live, and the order never changes. For more on rotating, see Hardpoint rotations.
P1: keep your back spawn blocked
- Know the danger spots. Top Blue looks down on P1. Watch White Wall, Shop and Mid Cut, and the flanks through P2 and P3.
- Holding from the green side? Keep one player in Top Green. They block your back spawn and can shoulder the P2 cross. If they die, the spawns flip. Put another player in Shop to cover the cross from the enemy spawn to the hill.
P2: hold it from the green side
Going from P1 to P2, the green side of the hill is easier to hold. Here's the setup. One player in Top Green or Top Broken blocks the back spawn and watches the flank. One on Top Red watches the Top Blue window and the Blue Roof, where enemies wall-jump up to see the hill. The other two push through the hill. The enemy then spawns out in the Yard. Spawned back Green while your team is on that side? Someone is pinching your Green, so turn around.
P3: win the Plane headglitch
- Get the Plane headglitch first. Everyone goes for it, and whoever gets it first has the edge. Until your team has it, the hill is very hard to brute force.
- Flip them before P4. The far enemy spawn on P3 is right next to P4. Late in P3, with 20 to 25 seconds left, release your block and let the enemy flip to the other side.
P4: the money hill
- Rotate early. P4 is easy to hold, and you can stack a lot of time on it.
- The setup. One player on the hill blocks the Yard spawn. One pushes into the Mid Cut side, which forces the enemy to spawn across the map. The other two watch the Sat cross, from the Shack and from the boxes outside P4.
P5: block the back, don't trap it
- Don't trap them in their back spawn. It's high risk. Die once, and they turn that close spawn straight into hill time.
- Block and push out. Keep one player at Green blocking the back spawn. Push one toward mid and one toward the Plane. The enemy then spawns behind P4, across the map.
How RankKD helps: RankKD breaks down your Scar Hardpoint hill by hill, with your rotation timing and your deaths to spawn flips.
Scar Search sites
Where A and B are
Both sites are on the west half, the green side. A is at the west end of Red, by the Dark-side Wood Stairs. B is by Green and Back Alley in the north-west, at P5. With both sites on that half, defenders hold the green side and attackers come from the blue side. For bomb timers, defuse math and opening duels, see SnD tips.
Take Shop the clean way
Don't challenge Shop through the mid door every round. Slide out toward P1 instead for a cleaner line on the Shop door, with teammates watching B Cut and Top Green.
Team-shoot Top Green
Top Blue against Top Green is one of the most common fights on Scar, and someone is in Top Green every round. Have a teammate get on the mid headglitch and shoot the Top Green window with you.
Hold B from the Plane wing
Run out of the map and back in onto the Plane's wing. It's a headglitch over the B push. Lie down there to also watch underneath and B Cut. Attacking B? Check the wing once you've cleared B and the top window.
Plant A's left corner
Plant on the left corner of A, then get to Top Green. Don't check the bomb from the obvious window. Go back to the stairs, hop on the railing and check it from there.
How RankKD helps: RankKD shows where you died first in each Scar SnD round, on a death heatmap grouped by callout.
Scar Overload
Goals and device spawns
Each side has two goals, A and B, lettered in game. On the east (blue) side, A is behind the Tank by Fish and Long, and B is just behind the south side of Blue, between L and the Yard. On the west (green) side, A is by Bridge near the Back Green spawn, and B is by Boxes and 18. The first device spawns at P1 in the middle. After that it spawns by P3, then by P2, in a fixed order. For the rules, see the Overload guide.
Score behind the Tank
On the east side, A, behind the Tank, is the easiest goal to score. All you need is mid control, and the defenders spawn in the bottom right, away from it. On the west side, go through P2 to B, by Boxes. P2 has cover, while Top Green sees the whole north lane.
Four kills at mid is enough
On Scar, you can win a wave at mid, pick up the device and score straight away. On Den and Exposure you need a second wave first.
Three down? Trade the carrier
When your team goes three down and the enemy grabs the device, act fast. Get to Top Blue or hop on the Tank and trade the carrier. Slow them with stuns and nades along their route, often Mid Cut to the Plane to A behind the Tank. A Trophy at the Fish fence choke helps too.
How RankKD maps your deaths on Scar
Those are the mistakes Scar punishes. RankKD shows you which ones you're making.
RankKD records every match on its own, so there's nothing to press. After the match, it reviews the footage and puts every kill and death on the timeline. On Scar, that gives you:
- A death heatmap by callout. Your deaths grouped into named areas of the map, so "I keep dying on P1" becomes a specific spot you can fix.
- Spawn-flip deaths in Hardpoint. The deaths that came right after a spawn flip, hill by hill.
- Rotation timing. Whether you left for the next hill too early or too late.
- Early deaths in SnD. First deaths of a round, and deaths early in a round, called out round by round.
- Death discipline. Deaths while sprinting, reloading or re-peeking without info, fights you took while already hurt, and deaths right after your own kill.
- Receipts. After each match, RankKD writes a coach's note. Every mistake in it links to the exact moment in the video, with your mouse, keyboard or controller inputs on screen.
- Map stats. How you do on each map and mode, and your worst map and why, compared with your rank and the rank above.
Example (illustrative, not real data): say your heatmap flags P5 as a top death spot. Check whether your team had the enemy trapped in their back spawn. That's the P5 risk: die once, and they turn that close spawn straight into hill time. Each of those deaths links to its clip.
RankKD analyzes your match after it ends, never while you play. No overlays, no assists, no live info, no mods and no in-game presence (read the full disclosure). RankKD supports Black Ops 7 and Modern Warfare 4 when it launches, including MW4 Ranked Play from the day it goes live. More on RankKD: how it works, VOD review, Call of Duty coaching and how to VOD review CoD.
RankKD runs on Windows PC. It shows you where and why you die on Scar, after the match and never while you play. No overlays, no assists, no live info. Download RankKD.
Scar FAQ
What are the main callouts on Scar?
Top Blue, Top Green, Shop, Mid Cut, Plane, Tank, White Wall, 18, Gens, Sat, Shack, Yard and Ammo.
What are the Hardpoint hills on Scar?
There are five: P1 in the middle of the map, P2 at Red, P3 under the Plane, P4 in Blue and P5 by Green.
What is the Scar Hardpoint rotation?
P1, P2, P3, P4, P5, then back to P1. Rotate early to P4, the money hill.
Where are the bomb sites on Scar?
Both are on the west side. A is at the west end of Red. B is by Green and Back Alley, at P5.
What are Blue and Green on Scar?
Blue is the blue building on the east side, where P4 is. Green is the green building on the west side, by P5 and B. The official map calls them Post Office and Wood Shop. Top Blue and Top Green are their top floors, which look over P1.