
 Modern Warfare 4
The main Colossus callouts in BO7 are Top Mid, Statue, Tunnel, Boat, God Heady, Blue Crate, the side doors and the Yellow and Blue lobbies. Hardpoint has four hills in a fixed order. P1 is Top Mid, in the center. P2 is Bar, at the Blue end of the Statue side. P3 is Boat, on the east edge. P4 is Couches, at the Yellow end of the Statue side. Then it's back to P1. In Search and Destroy (SnD), A is on the Statue side just south of Statue, and B is at Blue Crate.
Colossus callout map
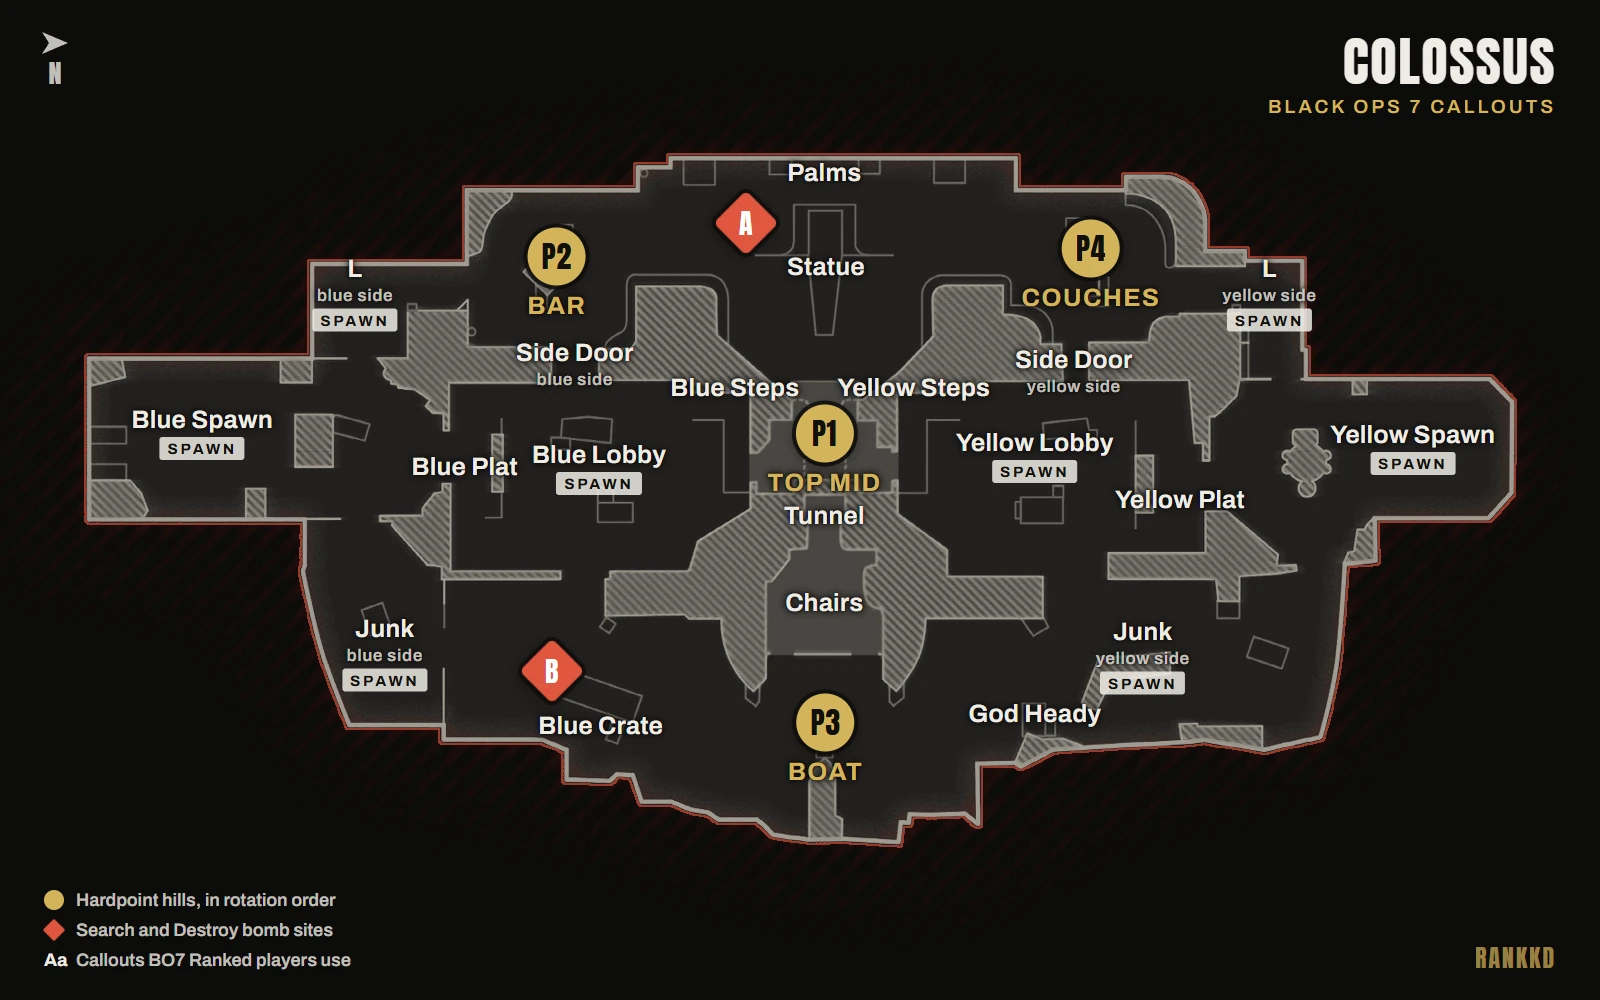
North is the Yellow side, south is the Blue side, and the two halves mirror. Think of the map in three lanes:
- Middle: the two lobbies, with Top Mid (P1) between them and the Tunnel underneath.
- Statue side (west): Statue and Palms, with P4 at the Yellow end and P2 at the Blue end. A is just south of Statue.
- P3 side (east): Boat (P3), with God Heady on the Yellow side and Blue Crate on the Blue side. B is at Blue Crate.
Colossus callouts list
Most callouts come in pairs, one on each half. Say the color first, as in "yellow Junk" or "blue L".
| Callout | Where it is |
|---|---|
| Yellow Spawn / Deep yellow | The deep spawn at the Yellow end |
| Blue Spawn / Deep blue | The deep spawn at the Blue end |
| Yellow Lobby | The big room on the Yellow side. A main P1 spawn |
| Blue Lobby / Luggage / Loading | The big room on the Blue side. A main P1 spawn |
| Yellow Plat, Blue Plat | The platform between each lobby and its deep spawn |
| Junk (yellow and blue) | The corner behind each lobby, on the P3 side. A spawn |
| L (yellow and blue) | The L-shaped corner behind P4 and behind P2. A spawn |
| Top Mid / P1 | The top of the middle, and the P1 hill |
| Tunnel / Green / X-ray | The passage under P1 from Chairs to Statue |
| Hop Up (yellow and blue) | The wall jump onto P1 from each side |
| Yellow Steps, Blue Steps | The stairs up to P1 from each lobby |
| Balc / Balcony | The balcony under P1, facing Statue |
| Statue / T / Ramp | The big statue on the west side, facing Balc |
| Palms / Planters | Potted palms along the west wall, T1 to T4 from the P2 side |
| Side Door (yellow and blue) | The doorway from each lobby out to the Statue side. The yellow one leads to P4 and is also called Hole or Broken. The blue one leads to P2 and is also called Short |
| Rock (yellow and blue) | A corner at P4 and at P2 |
| Tree | A P4 corner by the yellow Side Door |
| Couches / Sofa | The curved couch in the back corner of P4, inside the hill |
| Barrel / Bar | A P2 corner. Many players call all of P2 Bar |
| Boat / Sub | The lifeboat at P3 |
| Chairs | The room between Boat and the Tunnel |
| God Heady / Godhead | The head glitch on the Yellow side of P3 |
| Trash | The corner between God Heady and Chairs |
| Vent | The Blue-side mirror of Trash |
| Turbine | A turbine in Yellow Lobby that players sit on |
| Blue Crate / Outer crate | The big crate on the Blue side, right by B. A P3 spawn |
| Caution | Next to Blue Crate |
What is Colossus in Black Ops 7?
Colossus is a new map that launched with Black Ops 7 on November 14, 2025. It's set on the sinking Colossus resort from BO2's "Karma" campaign mission. Two long outer lanes, the Statue side and the P3 side, frame the two big lobbies in the middle. The official map calls the lanes the Atrium and the Wreckage, and the lobbies Maintenance and Loading Bay.
Is Colossus in BO7 Ranked Play?
Yes. Colossus was in Ranked Hardpoint from the launch of Ranked Play in Season 02. It was in Ranked SnD at launch, left in Season 03 and came back in Season 05. It was never in Ranked Overload. BO7 Ranked Play has ended. Season 06 was the last season.
Colossus in the CDL
Colossus was in the CDL 2026 launch map set for Hardpoint and SnD. It left the SnD pool at Stage III on April 13, 2026, and stayed in Hardpoint through Stage IV. Colossus Hardpoint opened both the Major I and Major II grand finals.
Colossus Hardpoint hills and rotation
Hill order
| Hill | Name | Where |
|---|---|---|
| P1 | Top Mid | Center of the map, on top of the Tunnel |
| P2 | Bar | Blue end of the Statue side, by the blue Side Door and blue L |
| P3 | Boat | The east edge, between God Heady and Blue Crate |
| P4 | Couches | Yellow end of the Statue side, at the couches, by Tree and the yellow Side Door |
After P4 it goes back to P1.
When to rotate on Colossus
Win the last seconds of each hill for the next one. Get your kills just before the hill moves and lean toward the next hill, so they spawn far from it. Late on P1, take the P2-side spawns. More in Hardpoint rotations.
P1: win Statue and the hop-up
- Statue, not just the hill. P1 has three ways in: both stairwells and the hop-up from Statue. Hold Statue and the hop-up, and you hold the hill.
- Stun first. It's a grenade fest. Throw your stuns every time you spawn, and nade the steps.
- Read your spawn. In one guide maker's spawn charts, a Junk spawn means they lean toward Statue, an L spawn means they lean toward P3, and a deep spawn means they hold mid.
P2: block before you push
- The setup. One player hard-blocking by your spawn, one on each side of the hill, one pushed to P1. Blue L is your best spawn.
- Block every push. If a teammate pushes past Statue, someone stays back by your spawn, or they spawn behind you.
P3: own the Tunnel
- Tunnel, then God Heady. Own the Tunnel and you can hold either side. Lean to God Heady, the AR power spot, since P4 is next.
- Spawn them deep. Push to Blue Crate and they spawn deep at P2. Push to God Heady and they spawn deep at P4. Keep your back player as far back as your pushed player is forward, or they spawn behind you.
P4: the P2 setup, mirrored
Run one player on Statue, one on P1, one on time and one back blocking. Don't push into Blue Lobby. That blocks both of their spawns, and they appear behind you.
How RankKD helps: RankKD breaks down your Colossus Hardpoint hill by hill, with your rotation timing and your deaths to spawn flips.
Colossus Search sites
Where A and B are
A is on the Statue side, just south of Statue. B is on the P3 side at Blue Crate. Both are on the Blue half. Most kills get traded here, so play the first 40 seconds for info, then move in pairs. More in SnD tips.
Expect A, open B
A is the default site, and most teams go A. That makes B a strong blind counter, even in the first round.
Top Mid decides A
You need Top Mid to cover an A plant, so run a 3-1 with one player holding it. Going up late? Wall bounce three times instead of jumping once and climbing, so your gun stays up.
Defending A and holding B
- Defending A. Jump-peek A without showing much. A teammate on the B side shoulders B and Top Mid, strafing in and out of cover, and nades back A on info.
- B post-plant. Plant away from middle and cover from the box behind B. A wall bounce in the corner gives you a head glitch over all of B.
- God Heady. Teams pre-nade it. Wait out the nades, then take the angle.
How RankKD helps: RankKD shows where you died first in each Colossus SnD round, on a death heatmap grouped by callout.
How RankKD maps your deaths on Colossus
Those are the mistakes Colossus punishes. RankKD shows you which ones you're making.
RankKD records every match on its own, so there's nothing to press. After the match, it reviews the footage and puts every kill and death on the timeline. On Colossus, that gives you:
- A death heatmap by callout. Your deaths grouped into named areas of the map, so "I keep dying on P1" becomes a specific spot you can fix.
- Spawn-flip deaths in Hardpoint. The deaths that came right after a spawn flip, hill by hill.
- Rotation timing. Whether you left for the next hill too early or too late.
- Early deaths in SnD. First deaths of a round, and deaths early in a round, called out round by round.
- Death discipline. Deaths while sprinting, reloading or re-peeking without info, fights you took while already hurt, and deaths right after your own kill.
- Receipts. After each match, RankKD writes a coach's note. Every mistake in it links to the exact moment in the video, with your mouse, keyboard or controller inputs on screen.
- Map stats. How you do on each map and mode, and your worst map and why, compared with your rank and the rank above.
Example (illustrative, not real data): say your heatmap flags Top Mid as a top death spot on P1. That's the classic P1 mistake, stepping onto the hill before you throw your stuns. Each of those deaths links to its clip.
RankKD analyzes your match after it ends, never while you play. No overlays, no assists, no live info, no mods and no in-game presence (read the full disclosure). RankKD supports Black Ops 7 and Modern Warfare 4 when it launches, including MW4 Ranked Play from the day it goes live. More on RankKD: how it works, VOD review, Call of Duty coaching and how to VOD review CoD.
RankKD runs on Windows PC. It shows you where and why you die on Colossus, after the match and never while you play. No overlays, no assists, no live info. Download RankKD. Want to climb? Read how BO7 Ranked SR works and how to stop being hardstuck in BO7 Ranked.
Colossus FAQ
What are the main callouts on Colossus?
Top Mid, Statue, Tunnel, Boat, God Heady, Blue Crate, Chairs, Junk and L. Most come in a yellow and a blue version.
What are the Hardpoint hills on Colossus?
There are four: P1 Top Mid, P2 Bar, P3 Boat and P4 Couches.
What is the Colossus Hardpoint rotation?
P1, P2, P3, P4, then back to P1. Get your kills just before each hill moves.
Where are the bomb sites on Colossus?
A is on the Statue side, just south of Statue. B is at Blue Crate on the P3 side.
Is Colossus a remake of a BO2 map?
No. It's a new BO7 map, set on the Colossus resort from BO2's "Karma" campaign mission.