
 Modern Warfare 4
The main Sake callouts in BO7 are Bar, Low Mid, Bridge, Alley, Shrine, Mill, Park, Barrels, Plat and Loading. Hardpoint has five hills in a fixed order. P1 is the Bar, upstairs in the central building. P2 is the north-east building. P3 is the west building at the end of the Bridge. P4 is Rocks, the rock garden in the south. P5 is the north courtyard. Then it's back to P1. In Search and Destroy (SnD), B is in the Bar at P1, and A is the courtyard at P5.
Sake callout map
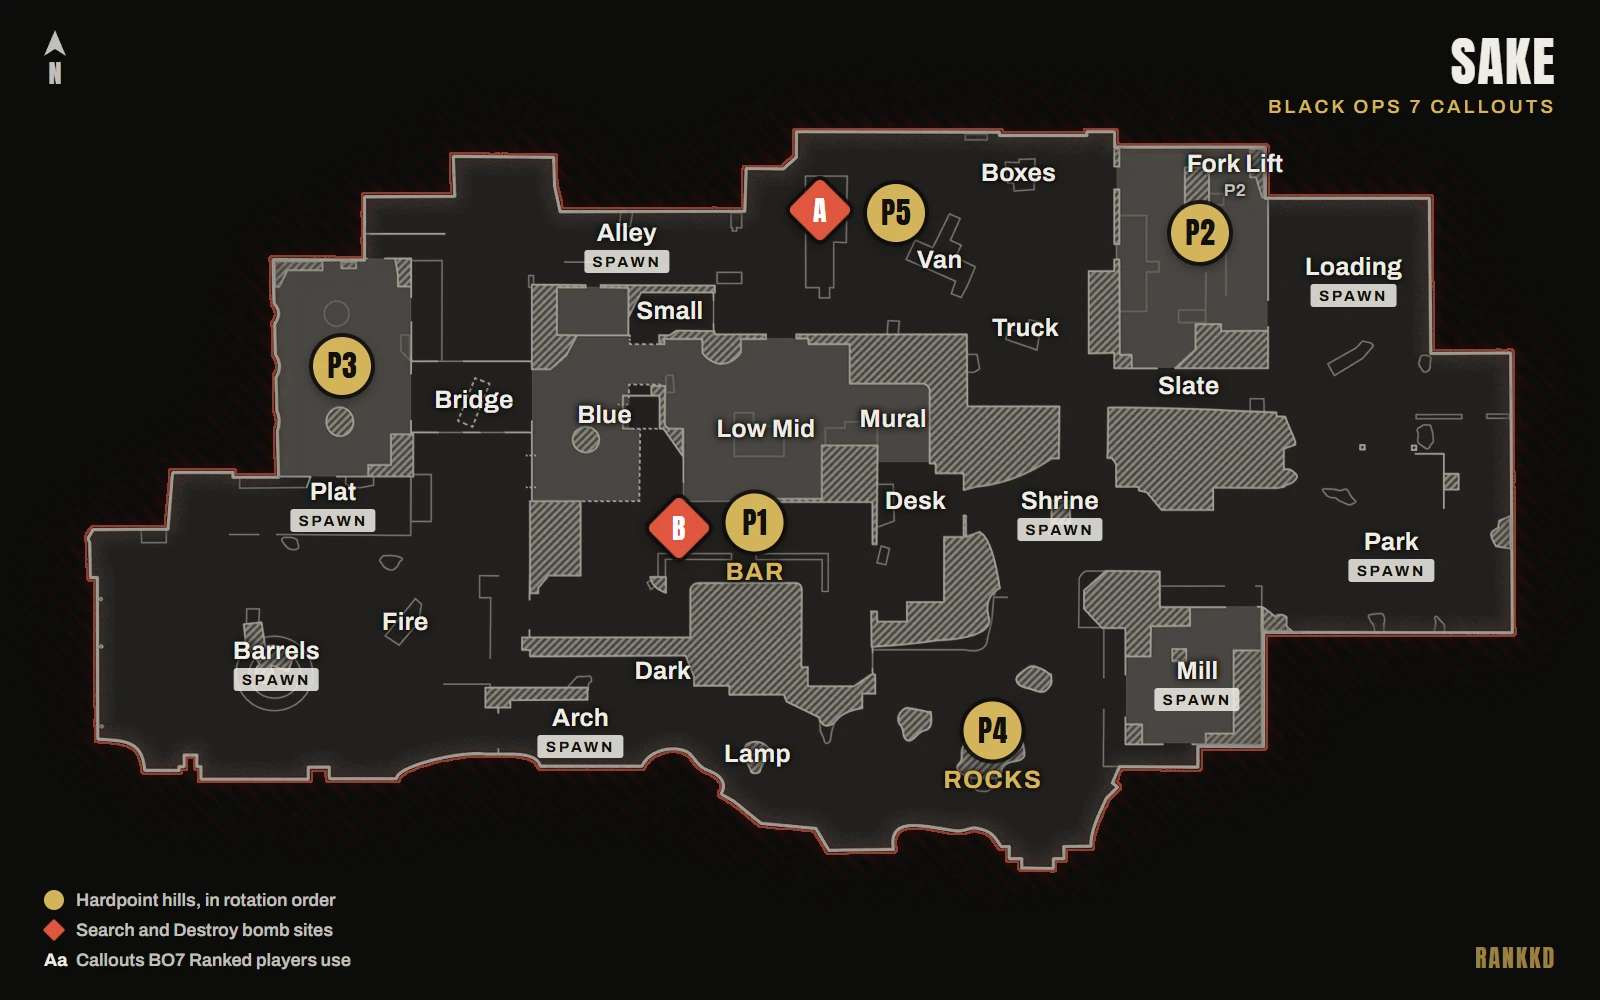
North is the Alley side. Think of the map in bands:
- West: Barrels, the roundabout spawn, with Fire and Plat. P3 is above Plat, at the end of the Bridge.
- Center: the main building. The Bar (P1) is upstairs, over Low Mid.
- North: Alley runs from P3 to the P5 courtyard. The P2 building and Loading are in the north-east.
- South: Arch, Dark and Lamp, then the P4 rock garden and Mill.
- East: Shrine, then the Park spawn.
Sake callouts list
Doors and windows take their hill's name, as in "P3 window" or "P2 back door".
| Callout | Where it is |
|---|---|
| Barrels / Roundabout | The west spawn, by two big barrels |
| Plat / P3 plat | The platform and steps below P3. A spawn |
| Fire / Fire car | The burnt car between Barrels and the center |
| Bridge (top / bottom) | The bridge into P3 |
| P3 Side Door | The north door of the P3 building |
| P3 Window | The P3 window that looks down Alley |
| Alley / Back alley | The north lane from P3 toward P5. A spawn |
| Arch / Archway | The south-west archway. A spawn |
| Circle | The south-west corner of the central building |
| Dark / Dark steps | South of the center, by Arch |
| Blue / Bottom blue | The lower floor with the blue tanks, under Pillar |
| Pillar | The upper floor on the west side of P1 |
| Elevator / Lift | The elevator shaft up to the Bar |
| Small / Small window | The small room north of the center |
| Low Mid / Bottom mid | The lower floor under P1 |
| U | The U-shaped corner in Low Mid |
| Bar / P1 / Top mid | The P1 hill upstairs, and the B site |
| Mural / Art | The steps by the mural, east of the center |
| Desk | The room with the desk, east of P1 |
| Table / P4 window | South-east of P1, with a window toward P4 |
| Lamp / Rock | The rock with a lantern, south of the center |
| Inner | The inner side of P4 |
| Gate | The south gate by P4 |
| Mill | The mill building east of P4. A spawn |
| Outer / Outer mill | The outside of Mill |
| Shrine | East of the center. A main P1 and P4 spawn |
| Park | The east spawn, on the grass |
| Shack | The shack behind Park |
| Slate / Slant | The slate wall south of P2 |
| Loading / Loading bay | Behind P2, in the north-east. A spawn |
| Bikes | The corner behind Loading |
| Forklift | A P2 corner |
| P2 Front Door | The P2 door on the P5 side |
| P2 Window / Top P2 | The P2 window toward P5 |
| P2 Side Door | The P2 door toward Slate |
| P2 Back Door | The P2 door toward Loading |
| Truck / Truck heady | The truck between P5 and P2 |
| Boxes / Cargo | The head glitch in front of P5 |
| Van / Top van | The van at P5 |
| Roof / P5 roof | The roof at P5 |
| Fence | The north-west corner of P5 |
What is Sake in Black Ops 7?
Sake is a new map. It came to Black Ops 7 with Season 02 on February 5, 2026. It's a mid-sized 6v6 map set in a traditional sake factory in Japan. Outside, the fights are mid to long range. Inside the factory, they're up close.
Is Sake in BO7 Ranked Play?
Yes. Sake joined Ranked Hardpoint in Season 03. By Season 05 it was in both the Ranked Hardpoint and SnD pools. It was never in Ranked Overload. BO7 Ranked Play has ended. Season 06 was the last season.
Sake in the CDL
Sake joined the CDL 2026 Hardpoint pool at Stage III on April 13, 2026, and the SnD pool at Stage IV on May 26, 2026. It was still a Hardpoint map at Champs. LA Thieves beat OpTic Texas on Sake SnD, map 2 of the Major IV grand final.
Sake Hardpoint hills and rotation
Hill order
| Hill | Name | Where |
|---|---|---|
| P1 | Bar | Upstairs in the central building, over Low Mid |
| P2 | The north-east building | Its doors, window and Forklift corner, with Loading behind it |
| P3 | The west building | At the end of the Bridge, above Plat |
| P4 | Rocks | The rock garden in the south, between Lamp and Mill. Its official name is Zen Garden |
| P5 | The north courtyard | By Fence, Roof, Van and Boxes |
Players call most hills by number. P1 is the Bar, and P4 is Rocks. After P5 it goes back to P1.
When to rotate on Sake
Rotate early. Sake is a big map with a long walk to each hill. Late rotations and badly timed deaths get punished, and the team that gets there first usually wins the hill. Win mid first. It's the pivot on nearly every hill. Most hills are on the east half, so live on that side. More in Hardpoint rotations.
P1: hold the Bar, wrap the bottom
- Top and bottom. Hold the Bar, and keep one player wrapping through Low Mid, over and over. P1 is a 50/50 hill, so don't expect to stack much time.
- Keep the P2-side spawns. Push one player up one side only, and keep someone back blocking. Push hard toward their side with nobody back, and they flip onto the P2 side.
P2: lock the spawns, then stack time
- No need to sit deep. One player just up from the hill blocks the back spawns and watches the door, the window and the cross.
- Stack time. P2 is hard to break, so get its spawns early and rack up time. Always block your side.
P3: push through to Plat
- Lock the back spawns. Standing on P3 doesn't block both of them. Push through toward Plat and Barrels, and keep someone back there at all times. These spawns are sticky.
- Breaking it? Don't run up Alley into the P3 window. Go Bridge or bottom, and kill the player in the back first.
P4: rotate early, spawn them far
- The setup. Rotate early for the close spawns. Then play one on time, one in the back building on the window, one on the front cross, and the last on time or pushed into mid.
- Send them to the Bridge. With their normal spawns blocked, they spawn at the Bridge or at Loading, whichever is further from you. In one guide maker's spawn charts, one player sitting back on the Park side blocks Loading, so they spawn at the Bridge.
P5: play Boxes, keep the east side
- Boxes. Play the head glitch at Boxes, in front of P5. From it you watch the front and the steps.
- Look ahead. P5 is closer to a 50/50, so fight for the east-side spawns. They set you up for P1 and then P2.
How RankKD helps: RankKD breaks down your Sake Hardpoint hill by hill, with your rotation timing and your deaths to spawn flips.
Sake Search sites
Where A and B are
B is in the Bar at P1, upstairs in the middle of the map. A is the open courtyard at P5 in the north, by Van and Roof. Attackers start at the west end, by Barrels. Defenders start at the east end, behind Park. More in SnD tips.
How Sake Search rounds play
- Most rounds go B. A is almost a decoy. Use it to pull defenders, then hit B.
- SMGs win the openings. Fights come around corners, so snipers struggle. Fast SMG first bloods decide rounds.
- Mid sets up the round. Rounds start with a fight for mid. Lose it and you can't cover everything.
- On defense, switch lanes. The Elevator and the Bridge give defenders corners up top and down low. Once the attackers start watching the window, take the bottom lane.
How RankKD helps: RankKD shows where you died first in each Sake SnD round, on a death heatmap grouped by callout.
How RankKD maps your deaths on Sake
Those are the mistakes Sake punishes. RankKD shows you which ones you're making.
RankKD records every match on its own, so there's nothing to press. After the match, it reviews the footage and puts every kill and death on the timeline. On Sake, that gives you:
- A death heatmap by callout. Your deaths grouped into named areas of the map, so "I keep dying on P1" becomes a specific spot you can fix.
- Spawn-flip deaths in Hardpoint. The deaths that came right after a spawn flip, hill by hill.
- Rotation timing. Whether you left for the next hill too early or too late.
- Early deaths in SnD. First deaths of a round, and deaths early in a round, called out round by round.
- Death discipline. Deaths while sprinting, reloading or re-peeking without info, fights you took while already hurt, and deaths right after your own kill.
- Receipts. After each match, RankKD writes a coach's note. Every mistake in it links to the exact moment in the video, with your mouse, keyboard or controller inputs on screen.
- Map stats. How you do on each map and mode, and your worst map and why, compared with your rank and the rank above.
Example (illustrative, not real data): say your heatmap flags Alley as a top death spot on P3. That's the classic P3 mistake, running up Alley into the player holding the P3 window. Each of those deaths links to its clip.
RankKD analyzes your match after it ends, never while you play. No overlays, no assists, no live info, no mods and no in-game presence (read the full disclosure). RankKD supports Black Ops 7 and Modern Warfare 4 when it launches, including MW4 Ranked Play from the day it goes live. More on RankKD: how it works, VOD review, Call of Duty coaching and how to VOD review CoD.
RankKD runs on Windows PC. It shows you where and why you die on Sake, after the match and never while you play. No overlays, no assists, no live info. Download RankKD. Want to climb? Read how BO7 Ranked SR works and how to stop being hardstuck in BO7 Ranked.
Sake FAQ
What are the main callouts on Sake?
Bar, Low Mid, Bridge, Alley, Shrine, Mill, Park, Barrels, Plat and Loading.
What are the Hardpoint hills on Sake?
There are five, and players mostly call them by number. P1 is the Bar. P2 is the north-east building, P3 the west building at the end of the Bridge, P4 Rocks, the rock garden in the south, and P5 the north courtyard.
What is the Sake Hardpoint rotation?
P1, P2, P3, P4, P5, then back to P1. Rotate early, because Sake punishes late rotations.
Where are the bomb sites on Sake?
B is in the Bar at P1. A is the courtyard at P5. Attackers start in the west and defenders in the east.
What is the Bar on Sake?
The upstairs room in the central building, over Low Mid. It's the P1 hill and the B site.